Showing posts with label PowerShell. Show all posts

Wednesday, June 01, 2016

Powershell tidbit of the week

Some of you are familiar with SSLLabs.com

Of those who have used it, some of you probably have run into at least one of these limitations:
It doesn't work for sites on your intranet. It doesn't work for sites with no DNS. It doesn't work with SNI sites (sites whit more than one site on a server under different DNS names). It doesn't work  for any port other than 443, and it has to be a web server, not a mail server. so no way to test TLS is working  on your SMTP server and what ciphers it uses.... but NMAP has that if you can remember what command line options to feed it.

I put these 3 lines in a file called testTLSCiphers.ps1 to make it easier for me to remember, and you might want to do that too.

$ServerName = Read-Host -Prompt 'Input your server  name'
$Port = Read-Host -Prompt 'Input your server TCP port number (443 is most common)'
nmap --script ssl-enum-ciphers -p $Port $ServerName


The output looks something like this:
PS C:\Users\rod> C:\scripts\Powershell scripts\testTLSCiphers.ps1
Input your server  name: internalsite.local
Input your server TCP port number (443 is most common): 443
Starting Nmap 6.49BETA1 ( http://nmap.org ) at 2016-06-01 15:29 Eastern Daylight Time
Nmap scan report for internalsite.local (192.168.1.6)
Host is up (0.0010s latency).
PORT    STATE SERVICE
443/tcp open  https
| ssl-enum-ciphers:
|   TLSv1.0:
|     ciphers:
|       TLS_ECDHE_RSA_WITH_AES_256_CBC_SHA (dh 256) - A
|       TLS_DHE_RSA_WITH_AES_256_CBC_SHA (dh 256) - A
|       TLS_DHE_RSA_WITH_CAMELLIA_256_CBC_SHA (dh 256) - A
|       TLS_RSA_WITH_AES_256_CBC_SHA (rsa 2048) - A
|       TLS_RSA_WITH_CAMELLIA_256_CBC_SHA (rsa 2048) - A
|       TLS_ECDHE_RSA_WITH_AES_128_CBC_SHA (dh 256) - A
|       TLS_DHE_RSA_WITH_AES_128_CBC_SHA (dh 256) - A
|       TLS_DHE_RSA_WITH_CAMELLIA_128_CBC_SHA (dh 256) - A
|       TLS_RSA_WITH_AES_128_CBC_SHA (rsa 2048) - A
|       TLS_RSA_WITH_CAMELLIA_128_CBC_SHA (rsa 2048) - A
|     compressors:
|       NULL
|     cipher preference: server
|   TLSv1.1:
|     ciphers:
|       TLS_ECDHE_RSA_WITH_AES_256_CBC_SHA (dh 256) - A
|       TLS_DHE_RSA_WITH_AES_256_CBC_SHA (dh 256) - A
|       TLS_DHE_RSA_WITH_CAMELLIA_256_CBC_SHA (dh 256) - A
|       TLS_RSA_WITH_AES_256_CBC_SHA (rsa 2048) - A
|       TLS_RSA_WITH_CAMELLIA_256_CBC_SHA (rsa 2048) - A
|       TLS_ECDHE_RSA_WITH_AES_128_CBC_SHA (dh 256) - A
|       TLS_DHE_RSA_WITH_AES_128_CBC_SHA (dh 256) - A
|       TLS_DHE_RSA_WITH_CAMELLIA_128_CBC_SHA (dh 256) - A
|       TLS_RSA_WITH_AES_128_CBC_SHA (rsa 2048) - A
|       TLS_RSA_WITH_CAMELLIA_128_CBC_SHA (rsa 2048) - A
|     compressors:
|       NULL
|     cipher preference: server
|   TLSv1.2:
|     ciphers:
|       TLS_ECDHE_RSA_WITH_AES_256_GCM_SHA384 (dh 256) - A
|       TLS_ECDHE_RSA_WITH_AES_128_GCM_SHA256 (dh 256) - A
|       TLS_ECDHE_RSA_WITH_AES_256_CBC_SHA384 (dh 256) - A
|       TLS_ECDHE_RSA_WITH_AES_256_CBC_SHA (dh 256) - A
|       TLS_DHE_RSA_WITH_AES_256_GCM_SHA384 (dh 256) - A
|       TLS_DHE_RSA_WITH_AES_256_CBC_SHA256 (dh 256) - A
|       TLS_DHE_RSA_WITH_AES_256_CBC_SHA (dh 256) - A
|       TLS_DHE_RSA_WITH_CAMELLIA_256_CBC_SHA (dh 256) - A
|       TLS_RSA_WITH_AES_256_GCM_SHA384 (rsa 2048) - A
|       TLS_RSA_WITH_AES_256_CBC_SHA256 (rsa 2048) - A
|       TLS_RSA_WITH_AES_256_CBC_SHA (rsa 2048) - A
|       TLS_RSA_WITH_CAMELLIA_256_CBC_SHA (rsa 2048) - A
|       TLS_ECDHE_RSA_WITH_AES_128_CBC_SHA256 (dh 256) - A
|       TLS_ECDHE_RSA_WITH_AES_128_CBC_SHA (dh 256) - A
|       TLS_DHE_RSA_WITH_AES_128_GCM_SHA256 (dh 256) - A
|       TLS_DHE_RSA_WITH_AES_128_CBC_SHA256 (dh 256) - A
|       TLS_DHE_RSA_WITH_AES_128_CBC_SHA (dh 256) - A
|       TLS_DHE_RSA_WITH_CAMELLIA_128_CBC_SHA (dh 256) - A
|       TLS_RSA_WITH_AES_128_GCM_SHA256 (rsa 2048) - A
|       TLS_RSA_WITH_AES_128_CBC_SHA256 (rsa 2048) - A
|       TLS_RSA_WITH_AES_128_CBC_SHA (rsa 2048) - A
|       TLS_RSA_WITH_CAMELLIA_128_CBC_SHA (rsa 2048) - A
|     compressors:
|       NULL
|     cipher preference: server
|_  least strength: A
Nmap done: 1 IP address (1 host up) scanned in 3.38 seconds

Thursday, September 19, 2013

Is It a VM?

Having a hard time keeping track of which machines on your network are virtual?

I have just the script for you. I wanted to have a way to quickly find out what machines were virtual at work, so I whipped this up in PowerShell today.

Param(
    [string]$ComputerName = 'localhost',
    [string]$ComputersListFile
)

if ($ComputersListFile) {$computers = Get-Content -Path $ComputersListFile} else {$computers = $ComputerName}
if ($ComputerName -eq'localhost')
    {
        if((Get-WmiObject -Class win32_bios).SerialNumber.StartsWith("VMware")) {Write-Output "This machine is a VM!"} else {Write-Output "This machine is probably not a VM"}
    }
else
    {
        invoke-command -ComputerName $computers -ScriptBlock {$hostname = hostname; if((Get-WmiObject -Class win32_bios).SerialNumber.StartsWith("VMware")) {Write-Output "$hostname is a VM!"} else {Write-Output "$hostname probably is not a VM"}}
    }

This only works as it is for VMWare virtualization, not for Hyper-V or VirtualBox, but it would be easy to add tests for those too. The test is to look at the BIOS SerialNumber and see if it starts with the string "VMware". It's just that simple. ...You could also look at the MAC address of the NIC and see if the first few digits match one of the VMWare prefixes, but the BIOS string was easier.


Run it like this:

.\IsItAVM.ps1 -ComputerName computer1, computer2, computer3

or like this if you have a list of computers already in a file:

.\IsItAVM.ps1 -ComputersListFile U:\computers.txt

Of course, this will only work if the computer you are testing is Windows with PowerShell and has PowerShell remoting enabled, and you are not blocked by a firewall... but in an IT environment where PowerShell is being used for management this fits nicely.

Have fun!

--
Edit: Added a little bit of code to better handle the localhost case. If you just run it as .\IsItAVM.ps1 or manually specify just localhost in the -ComputerName then it will not try to use Invoke-Command, so it will not need remoting turned on for a localhost check. Also it gives a slightly different message on a localhost check.

Wednesday, September 11, 2013

Why You Want Your Next File Server To Be Win2012 - Dedup

In the teaser post I showed you this image. It is a little bit misleading. My 722GB of data actually occupies 483.72 GB of disk space.
To compress it down to less than 2gb would require a type of black magick even Microsoft isn't able to produce.


I am using Windows 2012 data deduplication, which is a new technology that saves disk space by looking at each block on the disk and if there are multiple blocks that are the same it only saves one copy. So, if you have several copies of the same file, even if they are a little bit different from each other, or if you have files with lots of repetition (like log files), it can save you lots of space.

Because I'm using Windows data deduplication, the size on disk only shows the size of the metadata. With PowerShell's Measure-DedupFileMetadata command I can get the actual space used.


Adding the SavedSpace shown with Get-DedupStatus to the DedupSize shown by Measure-DedupFileMetadata indeed does add up to 721.26... just short of the Size of 722.68GB reported by the Measure-DedupFileMetadata and 722GB reported by the GUI. Given a margin of error on that calculation to account for rounding, that seems right to me.

Ok, so it didn't shrink it down to 2GB like the teaser might have lead you to think, but shrinking 722GB down to 484 GB is pretty impressive still, that's about a 33% savings. With a volume size as large as this (yup that says 20TB, but it's not real, we'll get to that in a later post) NTFS can no longer do file compression (NTFS file compression is not possible on drives that have a larger cluster size than 4K), but the new data deduplication applied at the volume level makes decently efficient use of space.

By now you are probably starting to see why it's suddenly important to start learning about PowerShell, if you haven't already started. The Windows GUI will no longer be sufficient to properly administer newer versions of Windows. For the past several years it was necessary for Exchange Server admins to get the most out of that product, and for Server Core editions of Windows Server to be manageable at their own console, but now newer features like Disk Deduplication and Storage Pools, require it in order to get the most out of these features. Much like Linux and Cisco, Windows is headed to an age where those who understand it's command line will be able to do much more, and do it much more efficiently, than those who only learn it's graphical interface.


So how do you go about setting up deduplication?

For starters, you need a separate disk from your OS boot disk. (you can't dedup c:)

You can install it via the old fashioned GUI:
Go into Server Manager
Click "Manage"
Click "Add Roles and Features"
Work your way down to "Server Roles"
Under "File and Storage Services", enable "Data Deduplication"


or, just open PowerShell and type:
"Import-Module ServerManager"
"Add-WindowsFeature -name FS-Data-Deduplication"

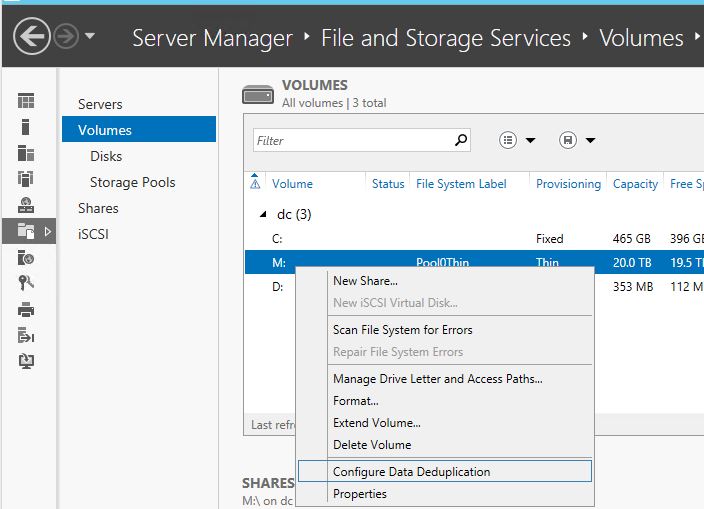
Enable it on a volume via the GUI:

In the Server Manager, select "File and Storage Services", and then "Volumes".
Right click on a volume, and select "Configure Data Deduplication"


or, via PowerShell:
"Enable-DedupVolume M:"

In the next post I will get into the details of Storage Pools. This is a really neat feature of Windows 8 and 2012 that puts the old RAID system to shame.